Saturday, October 21, 2023

More Testing

As I noted last time, I'm a little frustrated by combat dragging out in Micro Battle. I decided to do some more combat testing.

Some Revelations
As I experimented with combat mechanisms, I came to a couple revelations.
  • Opposed die rolls are too slow. I can only adjudicate one combat at a time. My older mechanism tested if the attacker hit, which allowed me to roll multiple attackers at once.
  • I need to go with a single roll to determine hits and retreats, for the same reason as above.
Changing these mechanisms will reduce dice rolls and speed play.

On Combat Resolution
The issue with a single "to-hit" roll is that you can get into an indecisive stalemate where neither side hits in its turn. Opposed die rolls worked better because one side usually wins.

To mitigate the issue, I'm going to experiment with a system where the attacking unit is defeated if it fails to hit. This should speed things up.

On Hits and Retreats
My initial mechanism allowed a unit defeated in combat to test whether it takes casualties or retreats. These were separate dice rolls. I based the mechanism on the concept that a defeated unit will either
  • take minimal casualties and stand firm
  • retreat with minimal casualties
  • stand firm despite casualties, or
  • take casualties and retreat. 
Testing casualties separately from retreats seemed the best way to cover all possibilities.

To speed things up, though, I want to merge these into a single roll. I'm not keen on having a binary system of retreat or take casualties. I want results to be more decisive. Therefore, I decided to test a 2-tier system where a defeated unit either (a) takes casualties or (b) takes casualties and retreats. 

Note that units can only take 2 casualties. This should make combat far more decisive. Perhaps too decisive. I will experiment with rallies.

The Test
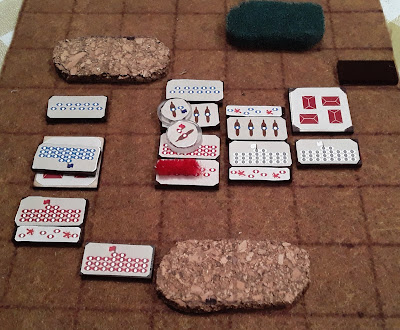
I decided to do a simple test with a small battle line on flat terrain.

Red has the initiative and attacks. All things being the same, Red needs a 4+ to win a combat.
It succeeds on the left and center but fails on the right.

Roll for results - Blue takes casualties but holds firm on the left and center. Red takes casualties and retreats on the right.

I experimented with rallies. On the right, the Red unit rallies.
Blue counterattacks, with its rightmost unit hitting Red's flank. I treat the flank attack as support for the main combat.
Blue succeeds on the left and inflicts a casualty. Despites its flanking attack, Blue fails on the right. The main unit takes a second casualty and routs from the field.

Red's turn to attack. It fails on the left and loses a unit. It double-teams blue on the right but loses miserably and takes a casualty.

Blue's turn. Both attacks fail. Blue loses a unit and the other must retreat with a casualty.

I think I missed a turn. Anyway, Blue has rallied and attacks Red, causing a casualty.

More missing turns. Blue destroys a Red unit then takes on the last remaining Red. Blue wins!

Assessment
The whole test took about 14 minutes to run. Hard to say if that is slow or fast; I need to do a full-blown battle to assess. Still, I like where this is going. Will need to experiment some more.

Saturday, October 14, 2023

3 x 3 Redux

Last year I made some unsatisfactory experiments with the 3 x 3 system. I shelved the concept at the time but now I have come back to it. In my most recent MicroBattle game, I noticed that the battle essentially devolved into left, center, and right sectors. Just like 3 x 3, I thought.

I did a little more digging into 3 x 3 and found some variants where they allow flank marches. So effectively it becomes like a 5 x 5 grid. I decided to try it out.

I'm doing a generic horse & musket battle. The armies, let's call them France (blue( and Austria (white), form up on a 3-square front.

I allow troops to move into the edge squares, expanding the field to 5. I don't have reserves for this test so I don't have a reserve area.

By now, France has the upper hand.

But the Austrians advance on the left.

At this point, I stopped the battle. I used a variant of my MicroBattle rules designed to make combat more decisive. The problem was that it wasn't - the sides kept making saving throws so combat kind of ground to a stalemate. I wanted something more fast-paced than standard MicroBattle, but this version wasn't delivering. So back to the drawing board.

Saturday, October 7, 2023

Taking on the Tower

A Ser Killian Adventure

Spoiler Alert - The following adventure is based on the D&D adventure Dragon of Icespire Peak. You may not want to read this if you plan to play that adventure.

Approaching the Tower
After a journey of about a day from Leilon, our party of heroes approaches the Tower of Storms. The tower sits upon a craggy island connected to the mainland by a narrow causeway that barely rises above sea level.


Traversing the causeway (1), they get attacked by 6 sahuagin. Our heroes dispatch the enemy in short order.
Note: I added some encounters and changed others to improve the adventure for solo play.


Next (2), a giant crab erupts from the sea and attacks Haiden. Haiden's spear finds a soft spot in the crab's carapace, wounding it. But the crab's claws snap onto Haiden's arm, drawing blood. The others come to assist, but their attacks glance harmlessly off the crab's armored shell. Finally, Killian lands a mighty blow that cleaves the shell and kills the crab.

They reach the island and begin to ascend the craggy slopes (3). They find a small cave. When Nashad peers in, a ghostly presence reaches out and possesses him.

"Before you take hasty actions, hear my tale!" the possessed fighter pleads. He explains how the unholy priest of the tower killed him and trapped his soul on earth. The spirit could not be freed until the priest was truly dead.

Agreeing to undertake the spirit's quest, the party continues toward the tower. As they approach its gate (4), a swarm of harpies attack. Their song charms Alyn and Nashad so Killian and Haiden must fight alone. Nevertheless, our heroes drive off the beasts.

The Tower
They enter the tower (5). A trap drops a stone on Alyn, who suffers an injury. They pass through a room (6) without incident and enter the back room (7). There, they meet the priest.


The priest unleashes a bolt of lightning, which strikes Killian in the chest and knocks him to the floor. Alyn rushes forward, and strikes a telling blow on the priest. Growling with anger, the priest lashes out at Alyn, drawing blood. Nashad enters the fray and scores another hit.

The priest attacks Nashad but Killian recovers and counters. The paladin's blade bites deep. The priest turns on him and drives him back with a series of attacks. He is about to strike when a sword suddenly pierces him from behind. The priest stares at the blade sticking through his heart.

The priest coughs and gasps, "you win today, but this is not over. My master will revive me...." With this he collapses.

The priest is dead but the tower's evil still pervades the place.

"We must destroy the root of this evil," Killian proclaims.

They continue up the tower, defeating a few cultists on one floor (8) before coming to the top. There, they see a heart lying upon a pedestal. The heart is beating and an eldritch light emanates from it.

"This is the source of the evil! We must destroy it!" commands Killian.

Nashad rushes forward. He swings his two-handed battle axe at the heart but a ray of light zaps him. Killian dodges another ray and stabs the heart. Nashad attacks again, this time slashing the heart. Finally, Haiden attacks. His strike splits the heart in twain. Then, the heart erupts with a burst of magical energy, knocking our heroes flat.

Aftermath
The spirit thanks the heroes for freeing him. He then releases Nashad from possession.

Victorious, our heroes return to Phandalin without further incident. They can now prepare their assault on Axeholm.

Wednesday, October 4, 2023

The Tower of Storms

A Ser Killian Adventure

Spoiler Alert - The following adventure is based on the D&D adventure Dragon of Icespire Peak. You may not want to read this if you plan to play that adventure.

Sorry about the long-winded account, but I want to set up their next adventure.

The Plan
After their defeat at Axeholm, Ser Killian begins planning to return and finish the banshee.

First, he sends a missive to the temple in Neverwinter, asking for reinforcements.

Then, he decides to travel to Leilon to seek a warrior to replace Gruff. Martin is still recovering so Killian and Haiden set out by themselves.

The Journey
The trip to Leilon takes a couple of days, but it is not without some excitement.

On the road, the come across a marauding ogre. It is a long, drawn-out battle, but Killian and Haiden finally cut down the monster.

As the first evening drew near, they come across a battered girl on the road. They nurse her back to health then escort her to Leilon.

The Tale of the Tower
The girl relates her story to the heroes. She was on a ship bound for Neverwinter. When an eldritch storm struck, they headed for a light, which they assumed was a safe haven. 


Unfortunately, it led them to their doom. The ship ran into rocks, which tore it apart. Most of the crew and passengers were lost, either to the waves or to the sharks that patrolled the rocks. She managed to make it to shore and stumble to the road where our heroes found her.

Leilon
Our heroes make it safely to the town of Leilon. They find a refuge for the girl at the local temple. Then they begin searching for help in their quest.

While making the rounds of the local taverns, they learn more about the Tower of Storms. Locals believed it was haunted, and the spirits of the tower feed off the souls of those lost at sea. The spirits are able to stir up storms and then shine a light to draw in unfortunate ships.

Hearing this tale of woe, Ser Killian proclaims a sacred vow to end the tower's malign influence. Perhaps not the best strategy, for local adventurers seem reluctant to join the quest. But finally they find two fighters so down on their luck that they will take any job. With that, Alyn and Nashad join the party.

To the Tower
On the way to the tower, our heroes run across a small group of marauding orcs. It's a brief fight, but the new heroes get a chance to show their stuff. They are ready for the tower!

What happens at the tower? Find out next time!

Sunday, October 1, 2023

Battle of Khukhusa and Fasu

THE PALMYRAN CAMPAIGN

This is the first battle of my fantasy campaign. In my world, Palmyra is a region similar to historic Egypt. However, it is threatened by the Hyenids (essentially gnolls) who raid from the south.

Background
The Imperial garrison gets word that a large Hyenid horde is raiding southern Palmyra. The Legion rushes south to stop the horde.

Set Up
The Legion (bottom) forms two lines.
  • First line (L to R) - auxiliaries, scouts, and an allied warband
  • Second line (L to R) - auxiliaries, legionaries (with commander), and an allied warband
Note: I'm using my old counters for this game. Red is the Legion and white is the allied warbands.


The horde only appears as a dark mass in the distance.

Note: I'm taking an idea from Geoff aka elliesdad and am hiding the enemy troops. I'll reveal them when they reach engagement range.

Objective
The Legion needs to take the villages of Khukhusa (L) and Fasu (R) so the Hyenids cannot sack them.

Victory will go to the side that seizes and holds both villages.

The Battle
Both sides advance quickly. One of the Legion's auxiliary units reaches the village of Khukhusa. On the Imperial right, a pack of giant hyenas attack a unit of allied warriors. I'm using cavalry counters to represent the hyenas.


First blood goes badly for the Legion. They lose Khukhusa and the regulars (center) take losses.

A ray of hope. An allied warband destroys the hyenas while the other warband seizes Fasu.

Then a concerted counterattack retakes Khukhusa and advances in the center.

A Hyenid assault on Fasu fails.

With this failure, the Hyenid commander calls retreat.

Aftermath
The Legion secures the villages, and the first victory of the campaign!