Sunday, November 30, 2014

Battle for Artemesia

Now that I had two space task forces, I wanted to put them into use. So this morning I ran a short game set in my Space Templar universe.

Recently, a coup overthrew the government of the Federation planet Artemesia, which lay near the border with the Empire. The new rulers, a dictatorial band of military leaders, are said to have sympathies with the Empire. A Federation task force has been dispatched to seize control of the space around the planet in preparation for a larger expedition to overthrow the coup leaders. The rebels have seized control of some Federation ships and are preparing to stop the Federation expedition. The two task forces meet in an asteroid belt of the Artemesia's system.

Each task force consists of a cruiser and two destroyers. In addition, each cruiser holds a squadron of fighters.

STATS
Ship Move CV Range Def
Cruiser 1 3 3 4
Destroyer 2 2 2 5
Fighters 3 3 0 4
The Federation ships are Quality 3 (cruiser and fighter squadron), 4 or 5 (destroyers)
Rebel ships are Quality 3 (a destroyer), 4 (cruiser), or 5 (a destroyer and fighters)

The Federation has the upper hand in Quality.

SET UP
The two forces begin on opposite sides of a sparse belt of asteroids (which serve as "cover")

As his flotilla passes through the asteroid belt, Commodore Halty on board the Federation cruiser Aladdin is warned of the approach of hostile ships.

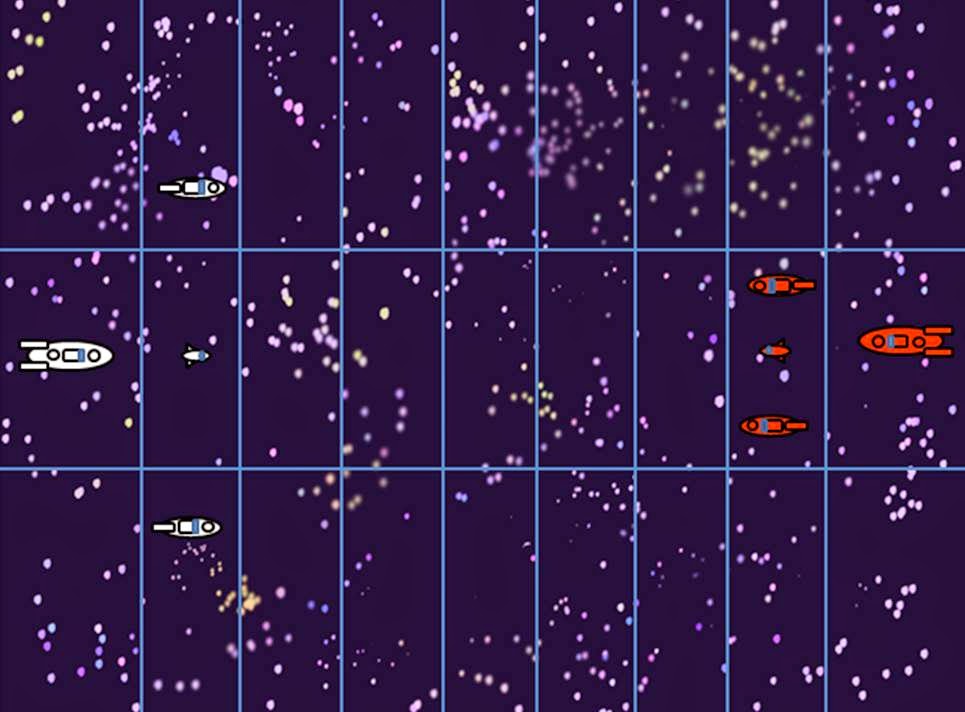
Starting positions.
Rebels are red and Federation ships are white.

Halty orders the launch of his fighters, the famed 501st "Blue Genies" (re-assigned after its battles against the Aquians). He then commands his ships to full thrust. The Genies rush forward into an asteroid belt, but the destroyers lag behind.

The rebel cruiser also launches fighters. Accompanied by a destroyer, the fighters approach the asteroids.

The Blue Genies probe forward
 The aggressiveness of the rebels concerns the Genies' commander and he orders a withdrawal, rendezvousing with the Aladdin.
Both flotillas move forward
 The Genies see an opportunity; rushing forward they launch torpedoes at the rebel cruiser. Their attacks hit the mark - the enemy is damaged.
The Genies strike the rebel cruiser
 The Genies continue their attacks while the Aladdin, with its broadside presented, opens up a withering fire upon the rebel cruiser. It is rendered a crippled hulk. Meanwhile, the Federation destroyers open fire and damage their counterparts. Through the bombardment, the rebel ships are strangely listless

  • Note - for 3 turns in a row, the rebel turn ended prematurely with 2 failures on the activation roll (I'm essentially using the Song of Blade and Heroes activation system).

The Federation pummels the rebel fleet
 The Genies zoom away from the crippled cruiser and engage their rebel counterparts. In the ensuing dogfight, the Genies took some damage and the enemy flees. Both enemy destroyers try to jump into hyperwarp. One succeeds but the other is pounded into submission.


End of the battle.
A rebel destroyer and fighter squadron (bottom left) flee
The Artemesia system is now open to a full scale assault against rebel-held areas. The Blue Genies earn a commendation for their efforts in crippling the rebel cruiser.

Final Tally
Federation - Blue Genies took minor losses. No other damage
Rebels - lose a cruiser and destroyer. The other destroyer was lightly damaged before fleeing.

Notes
  • The game lasted 7 turns for about 30-40 minutes - quick and easy resolution
  • I randomly rolled for Quality. The rebels were hurt by their higher (i.e. worse) scores. For 3 consecutive turns, the rebels's turn ended prematurely.
  • Dogfights seem to be dragging (over multiple turns). Perhaps I should not allow saving rolls to hits inflicted by a dogfight.
  • I'm already envisioning follow-up scenarios. 
    • I think a Federation battleship should appear to bombard rebel installations on the planet; I can see a bunch of rebel fighters attacking it.
    • I'm now pondering a sci-fi land battle for control of the planet. I just need rules and miniatures!
Saturday, November 29, 2014

Fleets Under Construction

After the success of my experiments on Thursday, I started plans on making a couple of small fleets. Yesterday, I picked up some supplies from Hobby Lobby and began to create. I started small, with a cruiser, 2 destroyers, and a squadron of fighters per side. To simplify, the cruisers and destroyers are the same design for both sides (captured and converted perhaps?)

Anyway, here they are:
Assembled ships.
From top to bottom - 4 destroyers, a cruiser, 2 fighter squadrons, and another cruiser
 Construction Notes

  • The hulls are made from pre-cut wood ovals I found at Hobby Lobby. The package I bought has 3 sizes of oval, ranging from about 1" to 2". I'll use the smallest for destroyers, the medium for cruisers, and the large for carriers and battleships.
    • The cruiser's second level is made from a chopped down destroyer-sized oval.
  • Engine nacelles are from a dowel.
  • Scraps of wood and rice* are used for superstructures.
  • Lentils* are used for turrets.
  • Rice or lentils are used for the fighters.
  • I glued the ships to the bases before painting for ease of handling (the cruisers nacelles are actually glued to the base rather than the ship).
* I got the idea to use rice and lentils from The Stronghold Rebuilt.


Today, I primed them black and painted them. I now have two small task forces.

The finished ships
Painting Notes

    • The primer came out a bit liquidy (I don't think I shook the can enough)
    • The white and red had trouble covering the black.
      • I used black because I was lazy and thought it would save me the trouble of painting the bases.
      • In the future, I think I will stick with gray primer. I've had the best results with gray (it covers the figures well but the paint goes over it easily).
    • I added some details in different colors to add a little variety to the ships. Turrets are in gold or silver. The picture doesn't show it but the white ships have blue stripes along the nacelles. I used orange to show the exhaust flames coming from the engines. I especially like the exhaust flames coming from the fighters.
I was initially displeased with the paint jobs (especially before adding some details) but now I think the ships are passable. I'll make some changes to the painting process for my next go around. My desired force composition is:

  • 1 carrier
  • 1 battleship
  • 2 cruisers
  • 4-5 destroyers
  • Half dozen fighter squadrons
I'm also thinking of different designs, such as round, saucer-like ships for my Aquians and jagged, pointy ships for the evil Empire.

Thursday, November 27, 2014

When It Rains It Pours

Less than a week ago, I was lamenting my lack of playing and blogging but recently I've been bitten by the space battle bug and have actively been jotting down rules ideas. Now with time off for the holiday and nothing to do (yet), I've finally managed to play a couple of short games. For the record, these are my first battles using actual miniatures since a medieval battle in September.

Set Up
I had some scrap black foam core so I made a small battle board. A year ago, I made a 2' x 3' hexed battle board, but I found it a little unwieldy. I think 2' x 2' is probably the maximum size I can do comfortably. My new board is 12" x 18" divided into rectangular zones. I like the purple ink I used to mark out the zones. It is visible but not obtrusive. The white dots are solely for aesthetic purposes.

In this scenario, I'm using a couple of my remaining starfighters as cruisers. A pair of painted disks (originally intended for use as initiative markers) serve as asteroids. I don't have rules for asteroids fully developed but I thought it could act as "cover."

Opening positions on my new battle board.

The stats for the ships are the same:
Ship
Move
Quality
Combat Value
Range
Defense
Cruiser
1
4
3
3
3

I described the combat system earlier today.

Battle # 1
The Aquian cruiser (left) was slowly advancing toward the asteroid belt, intent on lying in ambush. It was detected by the Federation cruiser which rushed forward. The Federation cruiser began to fire with its forward batteries but failed to hit.
  •  Note: I'm modelling my space battles after WW2 naval combat. More guns can fire to broadsides therefore firing forward or aft is a -1 modifier to CV. My plans for scratch-built ships will look more like WW2 battleships so the rule will make more sense.

The Aquians lazily headed toward the asteroids.

The Federation cruiser turned and opened up with its broadsides.Its accurate laser fire blasted through the Aquian hull and did severe damage.

The Federation cruiser pummels the Aquian

Desperate, the Aquian turned to flee  but was pursued by the Federation cruiser.
  • This point in the game required a little suspension of disbelief. I ruled that a severely damaged ship (like the Aquian) required double activations to move. Activations could not be saved for future turns. Unfortunately, the Aquians could only manage single activations and ended up not moving. The Federation also kept rolling single activations and chose to fire, but kept missing. As a result, the "pursuit" consisted of 2 ships sitting still. I had to imagine that they were moving, albeit slowly.
Pursuit!

In an attempt to dissuade pursuit, the Aquian opened fire with its stern batteries. It managed a hit to the Federation ship and then was able to escape.
  • The Aquian finally got a couple of rounds with 2 activations, enabling it to escape off the board. The Federation ship continually bombarded the Aquian, but could not hit.
The Federation cruiser is hit!
Shortly thereafter, the Aquian was able to escape.

THOUGHTS
  • This was quick, enjoyable game. It lasted 11 turns, although it was effectively over in turn 4 when the Aquians took heavy damage.
  • I'm debating increasing my board size to 18" x 24" (with eight 3" range bands)
    • If I do, I may add more than 3 zones per band, allowing for more lateral movement.
    • Note - when I make my scratch-built fleets, the ships will be smaller than the ones I used in this experiment.
  • I noticed that the saving roll is better if it is low but other rolls are better if high. I wonder if I should flip the saving roll so that high is good.
  • After the devastating damage in turn 4, I wonder if I should add Repair as an action (e.g. remove 1 damage if Repair roll >= Quality).
  • Should I have ships suffering damage to roll against Quality or be forced to retreat? Right now I'm leaning against it (although I use retreats for fighter dogfights as you'll see in Battle # 2).
  • Speaking of fighters, which types of ships can carry fighters? I planned on having carriers, battleships, cruisers, destroyers/escorts, and fighters. Being that these rules are heavily modeled after WW2 naval actions, I initially thought that only carriers should have fighters. Given that a starship does not need a long landing deck for fighters, it seems plausible that other ships could also carry fighters. Which ones and how many fighters?

When It Rains It Pours - Part 2

Battle # 2
For my second experiment, I decided to bring fighters into the mix. I plan to base 2-3 very small fighters together with each base representing a squadron. Like any ship, the squadron will have Quality, Combat Value, and Defense ratings. Range will be 0 (the fighters need to get in close to launch their torpedoes). They have a high CV to represent the devastating impact of their torpedoes and a good defense to represent the difficulty hitting them. When opposing fighter squadrons meet in a zone, they will use opposed die rolls to represent a dogfight with the loser suffering 1 or 2 hits and have to roll against Quality or else retreat 1 zone.

For this experiment, the Federation (left) has a destroyer and fighter squadron while the Aquians have a fighter squadron (I should have given them 2).The Aquians are trying to reach and destroy the Federation destroyer.

Ship stats:
Ship
Move
Quality
Combat Value
Range
Defense
Destroyer
2
4
2
2
2
Fed. Fighters
3
3
3
0
3
Aquian Raider
3
4
3
0
3

My cruiser from the first game now represents a destroyer while I made some quickie counters for the fighters (I'll make some proper bases at some point).

Starting positions (Federation on the left)
 The Aquians won initiative and rolled 2 activations, allowing them to move across most of the board. The Federation's 501st Fighter Squadron (the Blue Genies) intercepted, and a dogfight ensued. The Genies got the better of the fight, thinning out the enemy squadron a bit.
Dogfight!
The Aquians take some damage.

 The dogfight would continue for a couple of turns until the Aquians withdrew. During these turns, the destroyer took no action (I did not think it should fire into a dogfight for fear of hitting its own fighters).
After taking heavy losses, the Aquian squadron withdraws.
 The Aquian CO was not ready to quit. He doubled back and tried to reach the destroyer. As the Blue Genies prepared to pursue, the destroyer opened fire. Its accurate fire annihilated the raiders and the threat was over.
The end of the Aquians
THOUGHTS

  • This game lasted four turns - a nice, quick action. It will get interesting with some more ships on the board.
  • Treating a fighter squadron as a "ship" with similar stats seemed to work. Unfortunately, I could not get to the destroyer for a torpedo run (the Blue Genies did their job as interceptors!)
  • While I usually don't like opposed die rolls for missile combat, I feel that it is appropriate for simple dogfights, where fighters are going head to head.
  • I played that a squadron could not move once it was involved in a dogfight (except for retreats). I debated, and am still debating whether there should be some mechanism for breaking off from a dogfight and pressing forward. I initially did not allow it so that interceptors would be effective. Perhaps I could allow a squadron that won the last round of a dogfight the option of breaking off.
  • Conversely, being defeated and retreating allowed the Aquians a chance to bypass the Federation interceptors and approach their target. Perhaps I should allow a winning squadron the option of pursuing its retreating opposition into the next zone, keeping the losers locked into a dogfight.

Fire All Phasers!

From my readings, the Void and Stars rules use opposed die rolls for combat, which is the standard Song of Blade and Heroes system. I don't mind SBH's opposed die rolls for melee-intensive periods, such as medieval combat but it just doesn't feel right to me for missile combat. Opposed die rolls evoke images of warriors meeting face to face, testing their combat skills against each other. But firing? My combat ability (i.e. my ability to shoot) has very little to do with your ability to shoot me. For example, my initial experiments with DBA variants was for horse and musket battles. How do troops standing in rigid lines defend themselves against opposing attack (especially if the defenders have a shorter range and cannot fire back)? Since then, I've been rather skeptical of using opposed die rolls for missile combat. I know that it is just an abstract way of modeling the defender's use of dodging, cover, suppression fire, etc. to avoid getting hit, but it just doesn't feel right to me.

A response to a recent post by Kaptain Kobold about Void and Stars recommended a set of rules called USE ME (Universal Simple Engine for Miniature Engagements) Starship Battles. Interestingly, their combat rules are very similar to what I had in mind - roll D6 +/- mods >= a target number to score a hit. If there is a hit, roll to determine if it penetrates and then apply damage if applicable. There are 3 damage classes - winged, struck, and destroyed (with penalties to combat or movement at each level).

My initial thoughts for the combat rules:
  • Roll 1D6 per CV (which ranges from 2 to 4)
    • Hit on 5-6
    • Modifiers may apply
  • Defender rolls saving throws (based on their Defense rating)
  • Roll on Damage table to determine effect on hits (hull, weapon, or critical hits)
After reading USE ME, I'm thinking of dispensing with the damage table and using its 3 damage classes.

Tuesday, November 25, 2014

Engage!

 Over at The Stronghold Rebuilt, Kaptain Kobold discusses the issues with Void and Stars activation and movement system. Essentially, if a ship does not activate, it continues moving forward, possibly crashing into asteroids or other ships! Kaptain Kobold proposes a simple fix to avoid the issue.

This is not a problem I thought about or expected to deal with, primarily because I plan to take a different, more grand tactical if you will, approach to the game. I never planned on requiring ships to move every turn. Instead of the standard Song of Blades and Heroes movement, I planned to create a gridded board, something like the picture below (created in PowerPoint). If a ship fails to activate, I'll assume that it is slowly cruising in its current zone.

A sample gridded space battle board.
Each side features a cruiser, 2 escorts, and a squadron of fighters (represented by 1 ship)

The idea for this grid comes from the range bands featured in Minden Games' battleship game called Salvo! (note that Minden also produces Eindekker). Panzer 8 emulated the range bands for their WW2 naval rules, (You may notice that I envision starship battles as WW2 in space. It may not be accurate or plausible but I don't really care about that). I'm toying with further dividing the board into left, center, and right zones.

My plan will avoid the "running into planets" issue. It may be too abstract for some, but I prefer simpler, somewhat abstract systems. I think it will work, although I'll probably to run into other, currently unexpected issues.

Monday, November 24, 2014

Of Fleets in Space

A couple of months ago, an announcement posted to TMP caught my eye. It was a preview of a new set of rules called Galleys and Galleons. It provides for naval battles for 1-5 ships per side using the Song of Blades and Heroes system. My response was "genius!" While I'm not fond of the SBH scale (individual figures vs. units) I found the activation system intriguing (and used it in my latest medieval rules). When I read about G&G I realized that the SBH activation would be excellent for small "fleets" of ships, which then turned my thoughts to space fleets. I began to think  about taking G&G when it was released and modifying it to a spaceship game. Imagine my surprise and joy when I accidentally stumbled across a post on The Stronghold Rebuilt about a set of rules called Void and Stars, which featured space battles for small fleets using the SBH system. Alas, it appears those rules never went beyond the playtest stage. Nevertheless, I have been inspired to try my hand at writing up a basic set of SBH-inspired rules for space battles.

I do have one problem - no ships. I picked up a bunch of ships last year, but changed my mind and decided that they would not really do for fleet actions. Fortunately, The Stronghold Rebuilt has provided inspiration with scratch-built ships. I plan to make 2 small fleets out of balsa wood, although I may make some paper counters first.

Saturday, November 22, 2014

A Little Gaming

I took advantage of some free time to play a little this morning.

Tales of the Templars
A new episode of my Space Templars campaign has been posted here.

Solitaire Caesar
A while ago, I mentioned that I picked up Solitaire Caesar after reading about it on the Stronghold Rebuilt. Since then, I have been playing a campaign very slowly (about 1-2 turns per week, though I missed a few weeks recently). I made it up to turn 10 today, and am doing pretty well. Here is the way my empire looks, ca. 700 AD.


I'm doing the game with a virtual board, created in PowerPoint. I am able to use Shapes to represent the units (red for Romans and blue for barbarians) and cities. I even use virtual dice using this website.

I managed to hold off the Gothic and Hunnic invasions, preserve the western part of the empire, and reach a peak of 16 cities by 500 AD. Since then, Arab invasions sacked Jerusalem and Egypt. I think I am still in a position to survive another 800 years, although I think I'll lose territory in the east as the Arabs grow in power.

Con te partirò

Or more accurately, "Time to Say Goodbye."


This is a sentiment I have been pondering for a little while. As one can easily notice, my wargaming and blogging have declined dramatically in recent months (although I have been playing a lot of board games with my wife). I've been feeling pressure to post although I really don't have much to write about. Thus, I've been toying with the idea of shutting down the entire operation.

Fortunately, cooler heads have prevailed. I just need to remind myself that I have been using this blog as a wargaming diary so that in the future I can go back and see what projects I've worked on, etc. Because lulls are part of my wargaming experience the absence of posts is, in essence, documentation of my gaming goings-on (or not-goings-on). I may not post much in the coming weeks, but this blog is not going anywhere.

Now, for the first time in what seems like weeks, I have a free Saturday morning. I think I'll do a little gaming.

Sunday, November 16, 2014

A Double Victory

Over the past few weeks I have literally done no wargaming. Most of my free time has been spent making things for Amtgard, a live-action role-playing game.

My wife and I have been playing a lot of board games - often on Fridays and Saturdays. Last night we pulled out two short games, and I managed to win both.

Game 1 - Takenoko
My wife raced out to a big lead while I languished in last place, but I managed to pull ahead. She completed 7 tasks first, which allowed her to tie the game. I then completed 2 tasks in the final turn to pull out the victory.

Game 2 - Cthulhu Gloom
I managed to get a number of good cards allowing me to knock off my family one by one. At one point I was able to steal an Untimely Death from my brother-in-law. Later, he tried to steal it back but I was able to block him. I managed to wrack up 235 Pathos Points - in other words, my family was miserable.

The most difficult, but most enjoyable, part of Gloom, is making up the stories about how the characters meet their unfortunate fates. For example, my brother-in-law's character died when he fell through the ice and drowned. When I stole his death card, I made up a story how my character actually saved him but fell through the ice and drowned instead. Unfortunately, the authorities erred when identifying the body; as a result they thought that my brother-in-law's character has died. While creating these stories is not a requirement to play, they sure add to the fun.


Sunday, November 2, 2014

Francesian History - Return of the Katzplatters

It's been a while since I posted about Francesia so I thought I'd present some more history.
In my last historical installment, the Redgrave War ended with Duke Johann Drakendorf usurping the Imperial throne while the young Emperor Lester fled to Cragcoast. 

Shortly afterward, Lester was assassinated by unknown hands, presumably by someone in the pay of Johann the Usurper. The Katzplatter claim then fell to Lester's infant son, Leander. Johann would continue to reign, but his dictatorial nature and excessive taxation fueled discontent over the years. When he turned 18, Leander decided to make a bid for the throne. He gathered some loyalist forces and set sail for Egerford.


Leander's gambit appeared to be doomed as he approached the coast. An Imperial galley spotted Leader's ship Revenge and moved to intercept. There was an exchange of gunfire and the Revenge suffered some heavy damage. Yet its superior speed paid off and Leander was able to slip past the enemy.

Upon landing on the Egerford coast, Leander moved inland with his small force. He approached the nearest villages, intent on recruiting more supporters from among the militia organized to stop him. Meanwhile, Baron Rutger, Lord Constable of Egerford, assembled a small force of cavalry to intercept Leander. At first, the Egershire militia flocked to Leander’s banner. He was able to press his advance, securing two villages. But Rutger rallied Johann’s supporters and led a stubborn resistance. Leander’s main regiment broke and he withdrew to safety in the woods. But Leander’s remaining troops counterattacked. In the process, Rutger was killed and Johann’s supporters routed. The road to Silverfern was open.

The Battle of Egershire
Leander – 1,600 troops; 200 casualties
Egershire – 3,600 militia; 600 casualties (both sides)
Baron Rutger – 400 cavalry; 300 casualties + Rutger killed

Saturday, November 1, 2014

Halloween Update

I did not have time for an update last week because I spent Saturday playing Amtgard.
Ready for battle.
Pardon the glasses ruining the look.

Last night was our Halloween game night. We played a trifecta of horror games:

1. Zombie Dice

2. Monster Fluxx
 3. Zombies!!!

Ironically, our game of Zombies!!! basically ended the same as last year. My brother-in-law grabbed the car keys, raced to the helipad while killing a couple of zombies along the way, then flew away to safety.